Wednesday, October 24, 2012

Post Retreat (sigh)...But Project Complete!

So sad when retreat comes to an end....  Once again - I took WAY too much stuff.   HAHAHAHA! Go figure...  BIG Surprise. 

However... I legitimately only had one project goal in mind and I can proudly say that THAT got accomplished. It took about 3 days to pick the fabrics I wanted to use out of my stash.  But once I pulled EVERYTHING out....it came to me.  That AHA moment, when you have found exactly what you were looking for.  Unfortunately, it took rethinking every planned project pile in my sewing room, and several already in progress piles to find it.   But I wiped 2 UFO's that I was no longer interested in and used a beige mini polka-dot, that's been in my stash since the beginning of time, that I thought I'd never, ever use.


So here's the story.....I bought a purse from Walmart a while back and it has been the BANE of my existance.   It's like the bottomless pit of purses.   It didn't matter which section of the purse I put something in.....it was gone.   Poof!   Every day it was hunt for car keys, "where's my lighter??", what the heck happened to that $20 bill??... I would only find things after the third or fourth pass of the abyss and even then, I had to practically dump the entire thing out on the table to even find my keys, my phone, my bank card.  UGH.  In addition to this black hole of a bag, I was carrying an additional book sized tote bag to keep my new-found love - safe and sound.   My iPad.  

I swore to myself that when I finally got out of my "no-sew" rut, the first thing I was going to make was the MOTHER of all purses.   It took me most of the weekend, but I was bound and determined to GET-ER-DONE....

So first - I DUMPED my purse out on the table - and threw it away.  (That felt REALLY good).  Assessed the items that I tend to like carrying with me and then....measured my iPad.  Comfortably 8x10.   This would be the nexus of the bag.


  After a TON of Math - dreaming, thinking, adding pockets and features for the specific things that I like to carry....my ULTIMATE PURSE was born.
 
(can't you just hear the angels singing when you look at this?? - I sure do...)
 
And all my CRAP....including my precious iPad....fits perfectly in each little designated space.
 

So here's what I did.   I pulled out my pattern for "The Professional Tote" and went hunting the web for the Designer.    Found her!   Laura Martell at "The Creative Thimble" I browsed to the "Contact Us" page and immediately wrote to her desperately seeking the super secret formula to reduce her pattern with the center zipper pocket as the focus size to fit my iPad.  Cuz everybody wants to right?!?!?!

Laura, bless her heart, got back to me in less than 24 hours.    Now, I'll have you know that she was much more interested in joining us at our retreat house on the lake, but needless to say, she hadn't tried to reduce the size of the tote and tried to think it through with me.  In theory, I thought "reduce everything by 2 1/2 inches".  Voila!  Right?!?!  Yeah - probably not so much..  She quickly identified that pieces #2 and #3 shouldn't be altered one way, and #3 & 10.....yeah.    Good luck and have fun!  HAHAHA!  Send pictures!  Geez - thanks Laura.  <grin>

So then I texted my mathamagician genius friend Dee all in CAPS ....that I had an emergency math problem.   And like the geek that she is, within seconds, called with pen and paper in hand.   (dork.  lol)   So we measured the FINISHED center pocket (because I've already made a full size Professional Tote) and started reducing from there.  Dee helped me determine to get the center pocket to best fit my iPad was to reduce EVERY measurement in the pattern....by 20%.   So I copied the "tag" pages of the pattern on my printer and started doing the math.    Converted everything to decimals then multiplied by .80.  Found an engineering chart somewhere on line that gave me fraction equivalents in inches, and started changing all the measurements.

WARNING - Measure TWICE......Cut ONCE
 
I rechecked every calculation THREE times before I started cutting into fabric.   Very smart of me don't you think?   Good think too, cuz I screwed up in 2 places.
 
 
Then, and only then, was I ready to pack for retreat.  HA!  I went carefully down the list of required materials and checked them off one by one.   A quick stop at Joann's on my way out of town for 4 yards of black nylon "Strap" and I was off.
 
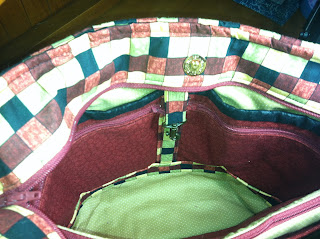
Once I got the fabric & interfacing cut out and fused together, I started to get very creative with the inside of the bag.   I love the front pocket with the lined pocket behind the lined zipper pocket, so I decided to make a double one on the inside.  Seperated it with a piece of fabric covered strap and added a kewl key fob.
 

Then - I added an extra layer of batting between the pieces for that inner zipper pocket to keep my iPad EXTRA safe.  The pleated pocket with the flap was a MUST for my charger & cable, because that's bulky.


Two lined pockets on either side of the inner pocket (instead of the vinyl see-through thingy" and viola!   She is done!  Once loaded back up again, I added an additional magnetic snap to the top because I knew I would never zip the thing shut, even though I ensured that the top zipper was added just in case I did want to shut it up tight.  :-)

Next Project?   The Quilters Wallet to match!  


Saturday, October 13, 2012

Fall Retreat Countdown - 6 days!

I get so excited this time of year!   Not only do I love the fall but as soon as the leaves start turning - I start thinking about Fall Retreat with my quilting gurlz....at Camp Asbury on Silver Lake!

 
6 more days.....   Actually - 5.  Because THIS time I've planned on being packed a day PRIOR.  Going to work with my car all loaded up - then heading to one of my BFF's houses to taunt and tease her while SHE packs!  There's always texts, and face book posts flying around the day before...all the girls poking at each other   "Are you packed yet?"   "Don't forget your clothes this time Jan!" Guess who's going to be sending all the messages THIS year... 
 
"I was ready yesterday!  What's your issue?!!?" 
 
I thought I'd take a few moments to look at some of the thing I've done on a few quilt retreats past.
 
Last fall - was a quiet retreat for me.   I had been going through some rough roads in life and was rather focused and subdued most of the weekend.  I finished out the weekend with a quilt design that I drafted by hand on graph paper, made some progress on my hand applique blocks and covered up the center of a bag that used to say something else.   Re-purposing of sorts.  :-)  Very satisfying.  This had been on my to-do list for quite some time.
 
 
2 years ago - I went WAY overboard with what I brought.  You get so many ideas in your head that with so much uninterupted time, you bring EVERY UFO (unfinished object) with you.  Yeah - I've learned since then...that unpacking AFTER retreat weekend really sucks if you bring too much.  LOL 
 
 
I had borrowed my friend Linda's "Viking Designer SE" and brought it along in addition to my own SE. So I had TWO embroidery machines!  ALL of my stabilizers, all of my thread, every notion, just bins and boxes galore.  My truck was FULL to the brim.    Both machines sat side by side humming all weekend long.   So much, that at the end of the weekend, I received the UNDER-achiever award because the girls said that I didn't actually DO anything!  The machines did it all for me!   HA!  If you are machine embroiderer - you know THAT'S not true.  But it was all in good fun. And I got SOOOO much done!  Embroidered shirts for my neices & nephew, Sweatshirt for my mom, a small wall hanging for my mother-in-law, Monogrammed towels for my friends Bill & Kelly, and lots of other embroidered things that were going into other projects.
 
On another retreat - I spent most of the weekend moving and positioning blocks around to finally complete my "Move Along Challenge Quilt".   This challenge started with a yard of fabric in a bag - passed to one of 12 people.  The person WITH the bag for the month, had to use your focus fabric to create a block (or any combination of blocks) that equaled 12" finished.  Every month they brought the bag back to the guild meeting, showed off their creation, and passed it along to the next person.   After 12 months, you got your blocks back and had to "complete" it.  I went through a "Halloween\Fall" phase for several years where everything was Halloween related. (Sorta still IN that phase...but I digress).. So of course, I had to load my bag with Halloween fabric.   I couldn't wait to get all my blocks back - but BOY it was a bigger challenge than I ever thought it would be!   So many different sizes! 
 
 
I was so proud to get them together, but I remember it took me most of that one retreat weekend to decide how to do it!  I ended up with two different finished pieces out of my blocks.  :-)  I put them in a local Quilt Show after that retreat.   No prizes won - but I was happy they were finished.
 
 
So as I sit here - trying to gear myself up to pick the "projects" I'm taking to work on for this years retreat.... All I can really think of - is how Grateful & Blessed I am to have the friends that I have.  I love these women - my Quilting friends - truly changed my life and continue to walk the journey with me.  Some of the faces change from year to year - but the hearts....the hearts never do.


Friday, October 12, 2012

October Embroidery Club

Holiday Mug Rugs!
 

These simply sweet mug rugs are just the perfect size for a cup of cocoa and a cookie or two. Or picture one with a glass of milk and special treat waiting to nourish that man in the red suit as he makes his rounds on Christmas Eve! They stitch up quickly and make great gifts, too.
 
This is an in the hoop project that works up quickly with very little “fussy” work. After the embroidery and trimming, all that is left to do is to close the turning opening by hand or fuse it closed.
 
Classes will be held at Amelia’s Fabric and Yarn Shop on Tuesday, October 16 from 1:00 to 4:00 pm or Thursday, October 18 from 5:30 to 8:30. Call today to sign up!

Supplies need for the class: (for one mug rug)
• Embroidery machine and unit with cords
• Design loaded in your machine or on a flash (USB) stick
• Printouts of your instructions
• 5 x 7 embroidery hoop
• 1 hooping of a light or medium tear away stabilizer
• 1 piece of Steam a Seam or Heat and Bond light that measures ½” x 4” (optional)
• Threads for the design
• Bobbin loaded with embroidery weight bobbin thread
• Blue painters tape
• Fabric cutting scissors
• Temporary spray adhesive
• Small sharp scissors for trimming appliqué
• Mini iron and ironing surface (a folded hand towel) – (optional but helpful)
• Two pieces of main fabric cut 6 ½” x 8 ½” for background and backing
• Two pieces of contrasting fabric cut 2” x 8 ½”for the top and bottom strips
• One piece of thin batting (Warm and Natural) cut 3 ½” x 7”
• One scrap of fabric for each appliqué (flour sack, mug, mitten, cookie jar) cut 4” square.

I apologize for the late notice this time, but fear not. All the supplies (fabrics and batting) are available for purchase that day at Amelia’s.

We will have time during club to complete at least one mug rug.

Here is the link for the design I used:
http://www.oregonpatchworks.com/items.php?did=76646&pid=149325
Hope to see you in class at Amelia's Fabric and Yarn Shoppe for some easy fun and stitching.
Vicki